- The Importance of Post-Processing in Underwater Photography
- Key Steps in Post-Processing Underwater Images
- Recommended Software for Post-Processing
- Workflow Efficiency in Underwater Photography
- Color Correction Techniques
- Saving and Exporting Your Final Images
- Advanced Editing Techniques
- Capturing the Best Images for Post-Processing
- Frequently Asked Questions
- Enhancing Your Underwater Imagery
The Importance of Post-Processing in Underwater Photography
Underwater photography presents unique challenges that make post-processing not just helpful, but absolutely essential. Water acts as a natural filter, absorbing light and colors as you descend deeper, which means even the most perfectly composed shot underwater will need some digital enhancement to truly shine. When you combine this with the physics of how light behaves underwater, you’ll quickly realize that what your camera captures is often just the starting point for creating stunning underwater imagery.
The key to successful underwater image editing lies in understanding that you’re not creating something artificial, but rather restoring what the human eye actually saw during the dive. Water absorbs red wavelengths first, followed by orange and yellow, leaving you with predominantly blue and green tones in your images. This natural color loss becomes more pronounced with depth, making effective post-processing techniques crucial for bringing back the vibrant life that exists beneath the surface.
Understanding RAW Format and Its Benefits
Shooting in RAW format becomes even more critical for underwater photography than it is for terrestrial images. RAW files contain all the unprocessed data your camera sensor captured, giving you maximum flexibility when it comes to recovering details from shadows and highlights. This is particularly important underwater where lighting conditions can be extremely challenging and variable.
When you shoot RAW underwater, you’re essentially giving yourself the ability to make significant adjustments to white balance, exposure, and color without degrading image quality. JPEG files, while convenient, compress and discard much of this valuable data, leaving you with far fewer options during post-processing.
Why Post-Processing is Essential for Underwater Images
The underwater environment creates conditions that simply cannot be perfectly captured in-camera, no matter how skilled you are as a photographer. Water scatters light differently than air, creating backscatter from particles in the water column. Additionally, the absorption of certain wavelengths means that colors appear muted or completely absent at depth.
Post-processing allows you to compensate for these physical limitations while maintaining the authenticity of what you experienced during your dive. The goal isn’t to create fantasy images, but to restore the colors and contrast that were present but couldn’t be properly recorded due to the challenging underwater environment.
How Water Absorption Affects Color and Detail
Water absorbs light selectively, with red wavelengths disappearing first at around 15 feet, followed by orange at 25 feet, and yellow at 35 feet. By the time you reach 60 feet, you’re working primarily with blue and green light. This progressive color loss means that images taken at depth will have a strong blue or green color cast that needs to be corrected in post-processing.
The absorption of light also affects contrast and detail visibility. Objects that appeared crisp and well-defined to your eye may look flat and lacking in contrast in your camera. Understanding this phenomenon helps you approach post-processing with realistic expectations and appropriate techniques.
The Role of Authenticity in Editing Underwater Photos
Maintaining authenticity while editing underwater images requires a delicate balance. The goal is to restore the scene as it appeared to your eye, not to create something that never existed. This means being conservative with saturation adjustments and avoiding the temptation to push colors beyond what would naturally occur underwater.
Authentic editing focuses on correcting the technical limitations imposed by the underwater environment rather than adding elements or dramatically altering the scene. This approach ensures that your images remain true to the underwater experience while still being visually compelling.
Key Steps in Post-Processing Underwater Images
The post-processing workflow for underwater images follows a logical sequence that addresses the most significant issues first, then moves on to fine-tuning and creative adjustments. Starting with basic corrections like exposure and white balance, you’ll gradually work your way through contrast, color, and sharpening adjustments to create polished final images.
This systematic approach ensures that each adjustment builds upon the previous ones, creating a cohesive and natural-looking result. Jumping around randomly between different adjustments can lead to over-processing and unnatural-looking images, so following a consistent workflow is crucial for success.
Adjusting Exposure for Better Visibility
Exposure correction is typically the first step in processing underwater images. Underwater conditions often result in underexposed images due to the reduced amount of available light. Start by examining your histogram and adjusting the overall exposure to bring your image into the optimal range without clipping highlights or shadows.
Pay particular attention to maintaining detail in both the brightest and darkest areas of your image. Underwater scenes often have extreme contrast between sunlit areas and shadows, so use graduated adjustments or masking to handle different areas of the image appropriately.
Enhancing Contrast to Bring Out Colors
Contrast adjustments are crucial for making underwater images pop. The water column naturally reduces contrast, making images appear flat and lifeless. Increasing overall contrast helps separate subjects from backgrounds and makes colors appear more vibrant and saturated.
Use the contrast slider judiciously, and consider using tone curve adjustments for more precise control. Local contrast adjustments using masking can help bring out details in specific areas without affecting the entire image. This selective approach often produces more natural-looking results than global adjustments.
Correcting White Balance for Natural Tones
White balance correction is perhaps the most important adjustment for underwater images. The blue or green color cast that dominates underwater photography needs to be neutralized to restore natural-looking colors. Start with the white balance presets, but be prepared to make manual adjustments using the temperature and tint sliders.
Look for areas in your image that should be neutral gray or white, and use these as reference points for your white balance adjustments. Remember that perfect white balance may not always be desirable, as some blue tint can help maintain the underwater atmosphere of your images.
Boosting Vibrancy Without Overdoing It
Vibrancy and saturation adjustments can bring life back to underwater images, but they must be applied carefully to avoid unrealistic results. Vibrancy is generally preferable to saturation as it affects less-saturated colors more than already-vibrant ones, helping to prevent oversaturation of certain color ranges.
Start with small vibrancy adjustments and evaluate the results carefully. Different subjects may require different approaches, with coral reefs often benefiting from more aggressive color enhancement than fish portraits or wide-angle scenes.
Sharpening Images for Clarity
Underwater images often suffer from reduced sharpness due to the water medium and potential camera movement. Apply sharpening judiciously, focusing on edge details rather than overall sharpening which can increase noise. Use masking to limit sharpening to areas that will benefit most, such as fish eyes or coral textures.
Consider the final output size when applying sharpening. Images destined for web use require different sharpening settings than those intended for large prints. Many editing programs offer output-specific sharpening options that can be applied during export.
Reducing Noise in Underwater Photos
Noise is often more apparent in underwater images due to the challenging lighting conditions that require higher ISO settings. Modern noise reduction tutorials and software have made significant improvements in handling underwater image noise while preserving important details.
Apply noise reduction selectively, focusing on smooth areas like water or backgrounds while preserving texture in subjects. Too much noise reduction can make images look plastic and unnatural, so find the balance between clean images and maintained detail.
Cropping for Better Composition
Cropping can dramatically improve underwater images by removing distracting elements and improving composition. Underwater photography often involves working quickly in challenging conditions, so perfect framing isn’t always possible during capture.
Consider the rule of thirds, leading lines, and subject placement when cropping. Remove distracting elements from the frame edges and ensure your subject has appropriate space within the composition. Remember that cropping reduces resolution, so maintain enough pixels for your intended output size.
Recommended Software for Post-Processing
Choosing the right software for underwater image processing can significantly impact your results and workflow efficiency. While there are many options available, certain programs have proven particularly effective for the unique challenges of underwater photography. The key is finding software that offers the specific tools you need while maintaining an efficient workflow that doesn’t consume all your surface interval time.
Different software packages excel in different areas, so many underwater photographers use a combination of programs to achieve their desired results. Understanding the strengths and limitations of each option will help you build an effective processing toolkit.
Using Adobe Lightroom Effectively
Adobe Lightroom serves as the foundation for most underwater photographers’ workflows due to its excellent RAW processing capabilities and organizational features. The program’s non-destructive editing approach means you can experiment freely without damaging your original files, which is particularly valuable when working with irreplaceable underwater images.
Lightroom’s masking tools have become increasingly sophisticated, allowing for precise adjustments to specific areas of your underwater images. The radial and graduated filters are particularly useful for underwater scenes, helping you balance exposure between foreground subjects and blue water backgrounds.
Photoshop Techniques for Underwater Photography
Adobe Photoshop provides advanced editing capabilities that complement Lightroom’s strengths. For underwater photography, Photoshop excels at precise color correction, advanced masking, and specialized techniques like backscatter removal. The program’s layer-based editing system allows for complex adjustments that would be difficult or impossible in Lightroom alone.
Photoshop’s healing and cloning tools are invaluable for removing backscatter spots and other distracting elements from underwater images. The program also offers superior control over color grading and specialized adjustments that can transform challenging underwater lighting conditions.
Exploring Topaz AI for Advanced Edits
Topaz AI software has revolutionized certain aspects of underwater image processing, particularly in areas like noise reduction and image sharpening. The AI-powered algorithms can often achieve results that would be difficult or time-consuming with traditional editing methods, making them valuable tools for underwater photographers.
The noise reduction capabilities are particularly impressive for underwater images shot at higher ISO settings in challenging lighting conditions. The software can often recover clean, detailed images from files that might otherwise be considered unusable due to noise levels.
Utilizing the RC-Astro Backscatter Eliminator
The RC-Astro Backscatter Eliminator represents a specialized tool designed specifically for underwater photography challenges. This software uses advanced algorithms to identify and remove backscatter particles while preserving image detail and natural-looking results.
Unlike general-purpose healing tools, the Backscatter Eliminator understands the specific characteristics of underwater backscatter and can remove it more effectively while maintaining the natural appearance of water and marine life. This specialized approach often produces superior results compared to manual backscatter removal techniques.
Workflow Efficiency in Underwater Photography
Creating an efficient workflow to maximize underwater time while still producing high-quality processed images requires careful planning and systematic approaches. The goal is to spend more time diving and less time sitting at a computer, which means developing streamlined processes that deliver consistent results without unnecessary complexity.
An efficient workflow begins before you even get in the water, with proper camera setup and continues through to final image delivery. Each step should be optimized to reduce time while maintaining quality, allowing you to get back to what you love most about underwater photography.
Importing and Tagging Your Photos
Efficient photo import and tagging systems save enormous amounts of time during the editing process. Develop a consistent naming convention that includes dive location, date, and sequence information. This systematic approach makes finding specific images much easier when you’re working with thousands of underwater photos.
Use keywords and tags to identify dive sites, marine life species, and shooting conditions. This metadata becomes invaluable when you’re trying to locate specific images months or years later, or when you’re building portfolios focused on particular subjects or locations.
Rating Photos to Prioritize Edits
Implementing a consistent rating system helps you focus your editing time on the images with the greatest potential. Rate images immediately after import while the dive experience is still fresh in your memory. This initial culling process eliminates obviously flawed images and identifies your best shots for priority processing.
Use a simple rating system that works for your workflow, whether it’s stars, colors, or flags. The key is consistency and making quick decisions based on technical quality, composition, and subject matter. This systematic approach prevents you from spending time editing images that will never see final use.
Organizing Photos for Easy Access
Develop a folder structure that makes sense for your shooting style and output needs. Many underwater photographers organize by location and date, while others prefer to sort by subject matter or dive type. The important thing is choosing a system and sticking to it consistently.
Consider using both folder organization and keyword tagging for maximum flexibility. This dual approach allows you to find images either by browsing folders or searching for specific criteria, accommodating different workflow needs and search patterns.
Creating a Consistent Editing Routine
Establishing a consistent editing routine helps maintain quality while reducing processing time. Develop a step-by-step approach that addresses the most common underwater photography issues in a logical order. This systematic method ensures you don’t miss important adjustments while avoiding the temptation to over-process images.
Document your editing steps and settings for different types of underwater scenes. This reference material helps maintain consistency across your portfolio and speeds up processing of similar images. Consider creating presets for common adjustments that can serve as starting points for your editing process.
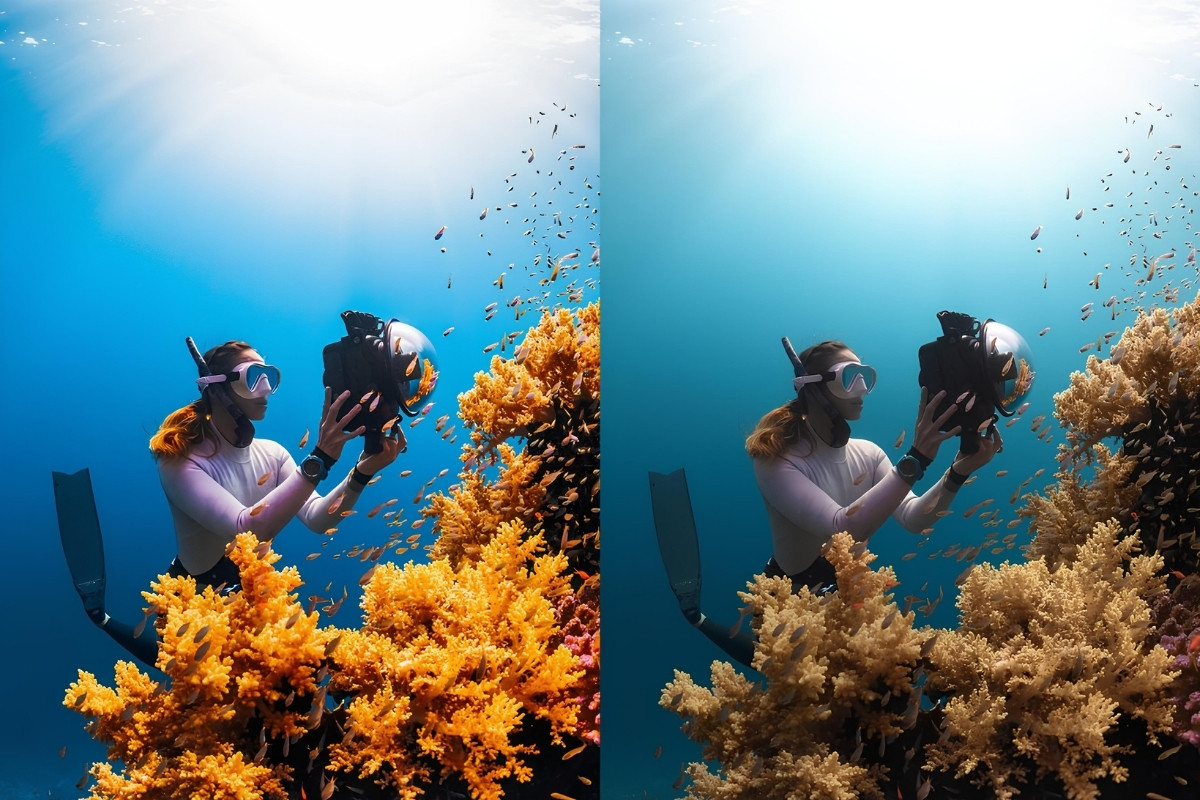
Color Correction Techniques
Color correction forms the heart of underwater image processing, addressing the fundamental challenge of restoring natural colors that have been filtered by water. The selective absorption of wavelengths by water creates predictable color shifts that can be corrected systematically, but the approach must be tailored to depth, water conditions, and available light sources.
Understanding color theory and how different wavelengths behave underwater allows you to make more informed correction decisions. This knowledge helps you achieve natural-looking results while avoiding the oversaturated, artificial appearance that plagues many processed underwater images.
Adjusting Saturation for Vibrant Colors
Saturation adjustments require a delicate touch in underwater photography. While the natural tendency is to boost saturation to compensate for the muted colors captured underwater, excessive saturation quickly produces unnatural-looking results. The key is enhancing existing colors rather than creating colors that weren’t present in the original scene.
Use selective saturation adjustments to target specific color ranges rather than applying global changes. This approach allows you to boost the reds and oranges that are most affected by water absorption while leaving other colors relatively untouched. The result is more natural-looking color enhancement that maintains believability.
Reducing Hotspots from Lighting
Strobes and video lights can create bright hotspots in underwater images, particularly when shooting close subjects or reflective surfaces. These overexposed areas can be distracting and may contain blown highlights that cannot be recovered. Learning to identify and correct these issues is crucial for professional-looking results.
Use graduated filters or masking to selectively reduce exposure in hotspot areas while maintaining proper exposure elsewhere in the image. Sometimes hotspots can be minimized by adjusting the overall exposure and then selectively brightening other areas of the image to maintain proper balance.
Dealing with Backscatter in Your Images
Backscatter removal requires patience and the right tools, but the results can transform an otherwise unusable image into a keeper. Small particles of backscatter can often be removed using healing or cloning tools, while more extensive backscatter may require specialized software or more advanced techniques.
When removing backscatter, pay attention to maintaining natural water texture and avoiding obvious signs of digital manipulation. Work at high magnification to ensure clean results, and be prepared to spend significant time on images with heavy backscatter contamination.
Saving and Exporting Your Final Images
The final step in your underwater image processing workflow involves preparing your images for their intended use, whether that’s web sharing, printing, or archival storage. Different output destinations require different file formats, resolution settings, and color space considerations. Understanding these technical requirements ensures your processed images look their best regardless of how they’re displayed or reproduced.
Proper export settings can make the difference between images that look professional and those that appear amateurish, so it’s worth investing time in understanding the technical aspects of image output and delivery.
Choosing the Right File Format
File format selection depends entirely on your intended use for the processed images. JPEG remains the standard for web sharing and general use due to its small file size and universal compatibility, but the compression can degrade image quality, particularly in areas with fine detail or subtle color gradations.
TIFF files offer superior quality for archival purposes and professional printing but create much larger files that may not be practical for web use or sharing. Consider maintaining both high-quality TIFF archives and optimized JPEG versions for different applications.
Preparing Images for Printing
Print preparation requires attention to color space, resolution, and sharpening considerations that differ from web optimization. Most professional printing requires images in Adobe RGB or ProPhoto RGB color space to take advantage of the wider color gamut available in modern printing processes.
Resolution requirements vary depending on print size and viewing distance, but 300 DPI remains the standard for most photographic printing applications. Larger prints may require interpolation or specialized printing techniques to achieve optimal results from your underwater images.
Utilizing Professional Printing Labs
Professional printing labs offer color management expertise and specialized papers that can dramatically improve the final appearance of your underwater images. These services often provide color proofing and consultation to ensure your images reproduce as intended on their specific equipment and papers.
Consider the viewing environment for your final prints when selecting papers and finishing options. Images displayed in bright environments may benefit from different paper choices than those intended for more subdued lighting conditions.
Advanced Editing Techniques
Advanced editing techniques can transform good underwater images into exceptional ones, but they require a solid foundation in basic processing skills and a clear artistic vision. These techniques often involve combining multiple exposures, creating artistic interpretations, or using specialized tools to achieve effects that would be impossible with basic adjustments alone.
The key to successful advanced editing is knowing when these techniques will genuinely improve an image versus when they might be unnecessary complications. Not every image benefits from advanced processing, and sometimes the most powerful technique is restraint.
Creating Black & White Underwater Images
Black and white conversion can create dramatic and timeless underwater images, but it requires a different approach than simply desaturating color images. Successful monochrome underwater photography relies heavily on contrast, texture, and composition rather than color to create visual impact.
Use channel mixing or specialized black and white conversion tools to control how different colors translate to grayscale tones. This control allows you to create dramatic contrast between subjects and backgrounds, even when the original color image had relatively subtle color differences.
Using Filters for Enhanced Effects
Digital filters can add creative effects to underwater images, but they should be used judiciously to avoid overwhelming the natural beauty of underwater scenes. Polarizing effects can help reduce reflections and increase contrast, while graduated filters can balance exposure between different areas of the image.
Consider the authenticity of your final image when applying filters. While creative interpretation has its place in underwater photography, maintaining some connection to the actual underwater experience helps preserve the educational and documentary value of your images.
Combining Multiple Images for a Single Shot
Focus stacking and exposure blending techniques can solve some of the technical challenges inherent in underwater photography. Focus stacking allows you to achieve greater depth of field than would be possible with a single exposure, while exposure blending can handle extreme contrast situations that exceed your camera’s dynamic range.
These techniques require careful planning during capture and significant skill during processing, but they can produce results that would be impossible with traditional single-exposure techniques. The key is making the final result look natural despite the complex processing involved.
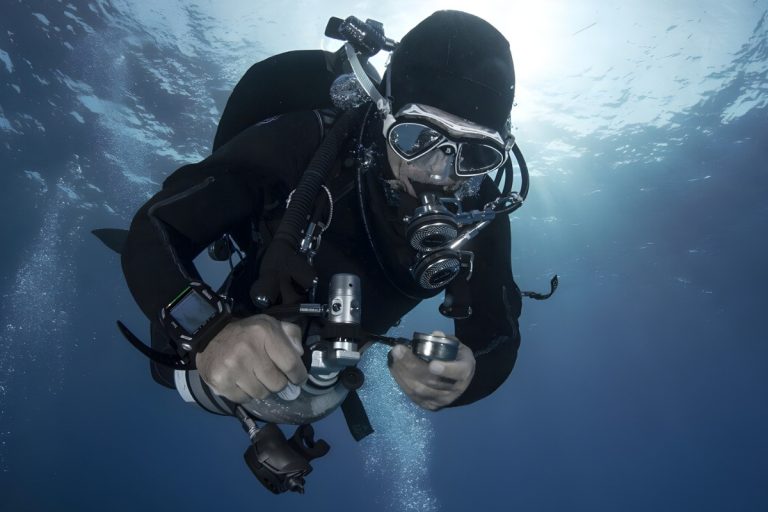
Capturing the Best Images for Post-Processing
The foundation of successful post-processing lies in capturing the best possible images during your dive. While editing can correct many issues and enhance your underwater images, starting with technically sound captures makes the entire process more efficient and produces superior final results. Understanding how your camera settings by depth and water conditions affect the final image helps you make better decisions underwater.
Proper in-camera technique reduces the amount of correction needed during post-processing, leaving more time for creative enhancements rather than basic problem-solving. This approach also ensures that your images maintain maximum quality throughout the editing process.
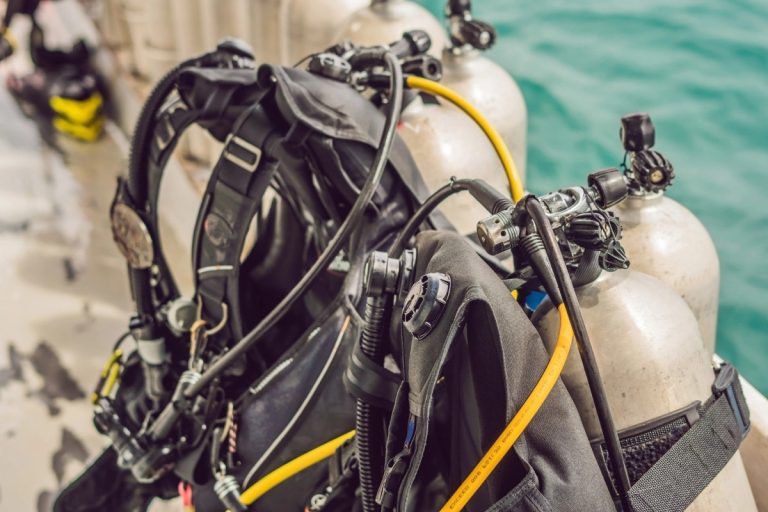
Choosing the Right Camera Setup
Camera setup for underwater photography involves balancing image quality needs with practical diving considerations. Full-frame sensors generally provide better performance in low-light conditions common underwater, but crop sensors can offer advantages for macro photography due to their effective focal length multiplication.
Housing selection affects your ability to access camera controls underwater, which directly impacts your ability to adjust settings for changing conditions. Choose a housing that provides easy access to the controls you use most frequently, particularly exposure compensation and focus point selection.
Optimal Settings for Different Depths
Different depths require different approaches to camera settings due to the changing light conditions and color absorption characteristics of water. Shallow water photography may allow for lower ISO settings and smaller apertures, while deeper diving often requires higher ISO and wider apertures to maintain reasonable shutter speeds.
Understanding how water affects light transmission helps you anticipate the settings you’ll need at different depths. This knowledge allows you to make quick adjustments underwater without missing opportunities while your subjects are present and cooperative.
Utilizing Natural Light Effectively
Natural light underwater creates some of the most beautiful and authentic-looking images, but it requires understanding how to work with the directional and color characteristics of filtered sunlight. Side lighting can create dramatic effects with marine life, while backlighting can produce stunning silhouettes against blue water backgrounds.
The quality and direction of natural light change throughout the day and with weather conditions, so successful underwater photographers learn to adapt their techniques to make the most of available light. This adaptability reduces reliance on artificial lighting and can produce more natural-looking final images.
Frequently Asked Questions
Why is post-processing important for underwater photography?
Post-processing is essential for underwater photography because water absorbs light and colors differently, leading to muted and distorted images that require digital enhancement to restore their vibrancy.
What are the benefits of shooting in RAW format for underwater photography?
Shooting in RAW format allows photographers to retain all the unprocessed data captured by the camera sensor, providing maximum flexibility for adjusting white balance, exposure, and color during post-processing.
Which software is recommended for post-processing underwater images?
Adobe Lightroom and Photoshop are highly recommended for underwater image processing, as they offer robust RAW processing capabilities, advanced editing features, and efficient workflow options.
What are some key steps in the post-processing workflow for underwater images?
Key steps include adjusting exposure, enhancing contrast, correcting white balance, boosting vibrancy, sharpening images, reducing noise, and cropping for composition.
How can I maintain authenticity while editing underwater images?
To maintain authenticity, focus on restoring the scene as it appeared during the dive, avoid oversaturation, and make conservative adjustments that reflect the underwater experience.
Enhancing Your Underwater Imagery
Mastering post-processing techniques is crucial for underwater photographers who wish to capture the beauty and vibrancy of marine life. By understanding the unique challenges posed by the underwater environment and employing effective editing strategies, you can elevate your images and share the true essence of your underwater adventures.